Monday, August 5, 2013

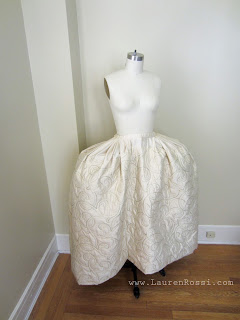
petticoat junction

I have had a mental block when it comes to executing the petticoat.  There is something quite foreign to me about trying to scoop out the front of skirt to ensure the hem lays parallel the ground. I am accustomed to be able to adjust the hem after the fact!

My futile desire for perfection has caused a great deal of procrastination.

That said- I finally decided to break down and create a petticoat out of muslin.  I wound up rebuilding the waist band twice.  The first time I pleated the fabric up- I found that it made odd bumps at the side of the hip.  Sloping the waist more gently rather than eliminating it to a direct point helped to eliminate this problem. I added a ruffle at the bottom for weight


  I initially thought that I could use this as an extra layer over my quilted petticoat for fullness. The reality is I am not likely to put a muslin skirt over a silk one. Still I am glad I made it because I learned a lot about the process without having to cut into a more expensive project.   


Sunday, August 4, 2013

Quilted Petticoat


I have made great progress on my quilted petticoat.  A quilted petticoat helps to hide the hoop ridges made by the Panniers/Pocket hoops.  As an added bonus- it will help to keep me warm (probably too warm).  I have to remember that Carnevale is in Febuary and likely I will spend the whole time vacillating from freezing outdoors to sweltering indoors.

The Fabric:

Many months ago in the garment district I saw this embroidered gold scroll scroll quilted dupioni. I knew right away that is what I would use to for my petticoat but as I was in the very initial stages of researching- It was not the time to buy.  At the time I didn't have even a clue as to how much I would need and at 35$ a yard- I didnt want to get the wrong amount. I had a minor heart attack when I went back (months later) and could not find the bolt. Luckily I had photographed it and the salesman knew where it had been stored away. Had it been sold- It would not have been the first time that I have missed out on a stellar piece of fabric because I was unable to make a decision when I saw it.

Anyway- here is my fabric:


Along with my fabric I bought a 1/2 a yard of the closest matching silk dupioni I could find.  This is to add to the top of the skirt so I don't have to pleat the quilting into the waistband. Despite having 34,623 colors to choose from- they did not have a matching so I went with one slightly lighter.

When I got home I found that the slightly lighter dupioni really bothered me so I decided to take the risk and try to dye it ....in Luca's fancy coffee.  (it was all we had!)  I used the anything but scientific method of boiling 6 espresso's mixed with a wine glass full of water. I tested a swatch and it seemed to work. In goes the actual yardage- fingers crossed.  BAM! The fabric came out great  albeit as silk does it lost its crunchy hand when wet. I am ecstatic over the results and more than a little proud of myself (even if the results should really be attributed to luck over any skill on my part.)

I didnt have a big enough pot or enough coffee
fabric on top is original. In the middle is after dying and on the bottom is the embroidered quilting.

Construction: 

Unlike some store bought quilted fabrics which have fashion fabric on both sides-  this one is dupioni on front, polyester batting and a fusible web/stiffener on back.  It makes sense that they created the fabric this way because it would be a waste to use silk on the back of what likely to be a home decorating fabric. The unfinished back meant a lot more work for me though.

Not only do I hate seeing things unfinished but I also was afraid this would be scratchy/uncomfortable on my legs so I decided to back the quilting.    When I initially sewed the quilting, skirt yoke and cotton muslin backing together I found that the stiffness of the quilting and embroidery left odd bumps at the top of the skirt.  I unstitched the yoke and by hand removed all of the embroidery in the seam allowance. I then pulled as much batting as possible from the top of the quilting to make it as thin as possible.  It took much longer and was much messier than I expected- but it worked.  

The quilted petticoat ties on in the standard way of 18th century petticoats.  All of my petticoats are being made with temporary ties which I will replace later.  

I hemmed the petticoat pretty short because I need to be able to wear it under both evening and walking skirts.  It is hemmed by hand with the fabric backing slip stitched to the hem for a clean interior.


Pocket hoops


I have finally completed my Panniers- twice. 


SET 1 (½) :

After reading so many blog posts about proportions and petticoats- I decided to undo the progress I had made on the initial set to make the pannier 3 inches larger.

The problem is that making the hoops larger made them very flimsy.  These were probably at the size that they needed to be a pannier instead of pocket hoops.  Making it even more difficult is that I was trying to achieve the pocket hoop look while only using the skeleton (bones) and no fabric.  This was strictly an aesthetic decision as I am likely to take a few photos in my unmentionables and find that pocket hoops are ugly.

I was finally able to make this shape work by adding a reverse hoop that help the largest and middle hoops out.  Supporting braces- much like a bridge- held the end of the hoop to the waistband while still leaving space to utilize the (yet to be made) pocket underneath.

These hoops worked.  That in and of itself is a feat!  However-  when I draped fabric over them (I hadn’t made a petticoat yet) I found that I just did not LIKE them.  I know that at carnavale bigger is better- I just could not get used to the proportions.  They seemed  comical, contrived and costume-y.  Three things I do not want.


This set back completely halted my progress and for about a week I hemmed and hawed over IF I should make a new set (So much work went into this pair!)  I could not make a petticoat until my hoops were confirmed and this (and my inability to make a decision) greatly stalled my progress. 

Set 2.

Of course I decided to remake the hoops- slightly smaller this time. I took each hoop down by 3” and am much much happier with the result.   The slightly smaller hoops mean that I no longer need the reverse hoop (which worked but I did not like).

As I have dropped the top Hoop off from the waist- I still need the supporting pieces however these actually add to the architectural feel of the piece.

I also have tested to see if the waistband will fit under my stays like I want - and it does! 


Finally I have no excuse to not move on to my petticoat (except my own procrastination)
The focus that i spoke so excitedly about in my last post has sadly eluded me for a little bit.  A large part of this is because during this time- I moved!   Not far- just to another apartment- but as anyone who has tried to move in the city knows- it is exhausting.  Our new place is much nicer, larger (relative for nyc) and closer to the garment district however we have zero pieces of furniture. Not even a chair to sit on.

As a result- I have to sew while sitting on the floor with my machine infront of me. Awkward to say the least


It reminds me of freshman year of college when I made an Elizabethan gown on the floor of my dorm.  Only unlike college - this kills my back now and makes it very hard to work for more than a few hours in a row. Old age! 


I am definitely looking for a table right away

Friday, June 7, 2013

Marathon

Some people run marathons- I, however,  lacking both any athletic inclination nor the mental fortitude for long term strenuous exercise- instead have sewing marathons.

This happened a few weekends ago (sadly since I have been too busy with non sewing stuff (moving! work! visitors! to blog).  

In total that weekend (from Friday after work to sunday evening) I sewed a total of 38.5 hours and virtually (minus the fitting and stomacher which still needs to be done) completed the main body of my pet en l'air.  

It is very rare for me to have such focus- so I have learned that when I do- I must capitalize on it.  One of the downsides of such focus is that it is difficult for me to stop to document the process so instead you will have to settle for a few haphazard and awkwardly timed photos that truly dont show the scope of how this garment is put together.  Still -I hope you enjoy. 

On friday night I sewed the lining out of the leftover unbleached canvas that I used on my corset and hand made the eyelets that close the garment (till almost 4am)


Cutting out the fashion fabric (100% silk taffeta) took me a great deal of time- mostly because i wanted to make sure the left and right halves of the garment matched up as closely as possible.  Much to my surprise- the repeat of the stripes in the silk was not consistant from selvedge to selvedge necessitating me placing my pattern pieces very stratigically to make them identical. Thankfully this is one instance where I had plenty of fabric did not have to struggle with running out.


I decided to half flatline/half bag line the silk outer fabric.  The pattern does not call for lining as it is historically based. I, however, hate seeing raw edges and I like the shape that the cotton lining gives the silk. I lined the garment with the many many yards of unbleached muslin I bought for mock ups. One of the benefits it (since I read ahead on the pattern) I was able to "hem" the garment in advance. The garment is short so my height has no effect on finished length.


  The pattern mentions not to be scared of the pleating in the back of the garment and in truth it was pretty easy- with the exception that it took a little bit of mental gymnastics (more perhaps because I was tired) to determine which way exactly the pleat fold (over or under)  Luckily (for once) I made sure to include all of the pattern markings.  


The back of the pleats are to be hand sewn down. Much like the eyelets I rather enjoyed this process.  Lacking a thimble, however, my fingers took a beating from forcing the needle through so many layers of fabric.  As duct tape is the solution to most problems- i fashioned a make shift finger cover.  This greatly eased much of my pain.  The next day my finger had tons of holes in it from the BACK end of the needle.  ouch.


The directions call for the top of the back of the pleats to be cut as one piece but since my fabric is assymetrical- I split the pattern, added seam allowance and cut this so it lined up with as large a portion of my pleats as possible.  I have to admit- this is one of the parts I am proudest of on the garment even if likely no one will notice it. ( I will prob use the same technique on the stomacher)
lining up the pattern
after being very very careful sewn down
I don't have any images of me setting the sleeves in however making the mock up was incredible useful because I already understood how they would set in- and how to cut the fabric to maximize the stripes I wanted to see prior to working with my fashion fabric. 
 
lining before it is set into garment.


The front of the robe and the side pleats will be officially tacked down after I have another fitting.  Here is the garment without the final fitting, trims and stomacher


What I like:

  • I got very lucky with the fabric I chose as when pleated it looks even more elegant than it did on the bolt- It also loses some of the Americana feel I was afraid would be too evident
  • The inside of the garment is 'clean' finished
  • I like the adjust ability in the back (the hidden ties)
  • While I was initially thinking I would use a light cream colored silk for the outer petticoat- I am leaning more and more towards a washed out red.  I feel it will give the garment more visual interest. 
What I learned for next time:
  • When I make this as a gown- I would like more fullness in the skirt. I also think cutting the skirt as a separate piece from the bodice would give you more freedom with fit.
  • I know the slits for the pockets are historical but I am not sure how i feel about them.  They seem like gaping holes without all the undergarments. Hopefully as it all comes together- they will make more sense.  If not- i plan on stitching them shut
  • It is impossible to be sure this fits as I sew it because I cannot try it on.  I find this very stressful as I get to the later aspects of tacking down robings.
  • I need to buy a thimble     


Saturday, June 1, 2013

Fitting


My frustration with the cursed panniers has caused me to abandon them (temporarily) and look at other aspects of my project.

I decided that I would create a Pet en l'air before I made my Robe a la Francaise.  A pet en l'air is a shortened version of the latter.  By making one- I could get a better feel for how the pattern goes together and work out any kinks before I have to cut the longer and more expensive version.  Additionally- for my gown- I want to deviate from the pattern.  Having not made this gown before- altering the pattern would be like changing a recipe you've never tasted.  It's too hard to know how much or exactly wear to change.  


I started with making a mock up of the lining only. 
 

Doesn't really fit my form because my form can't wear stays


I really like how the back of the gown uses hidden ties to make it adjustable- perfect since I’m making a gown for many months from now and weight can change! (hopefully for the better!)


I am so lucky that for my 'regular job' I work in the apparel industry with many talented designers.  One of whom offered to help me with fitting my mock up Pet en l'air before work one day.  Of course it is impossible for me to fit myself in my own garment and so her help was invaluable in my process.  (thank you!!)


The sleeves seem really really big so we have pinned them in some. I am worried that if the sleeves don’t fit- my costume might look more like a rental.
  Next:  on to making the garment!

Thursday, May 23, 2013

Impulses


After work one day last week I decided to peruse the Garment District to see if any fabric caught my attention.  After an hour or so of fruitless searching- on a whim I asked about the price of this silk taffeta.


There is something  elegant about this
  After some haggling- I was able to buy everything left on the bolt (6 yards give or take) for what I felt was a reasonable price.  The entire way home- and I walked!-    I questioned my impulsive buy!  This fabric is not close to the colors or style I thought I would be buying.  Additionally 6 yards is far too much for a Pet en l'air but not enough for a gown. I also wish it was wider- It is about 49" wide  

Did  I make a huge mistake?  Final decisions cause me so much anxiety.  I need to work on that. 
Close up in better lighting makes all the difference.

Wednesday, May 15, 2013

Ring around


Since my stays are complete- I have begun work on my Pannier.  It is proving to be much more difficult that I expected to achieve all of my wants with this project

The pannier is made of buckram covered hooping wire sewn into natural colored twill tape channels.  Each of the bones are trimmed and taped to prevent them from poking through.  I use the natural bend of the wire to achieve the shape. 

  • Wants:
    • For it to be supportive!!!
    • For the pannier to fit under my corset (this is the first thing I Will abandon if necessary)
    • For it to be a skeletal frame only (rather than pocket hoops which I find to be ugly)
I'm finding that I can achieve the look I want but it does not have the strength I desire. The cage skirts I already make are more modern but are intended as outwear.  I am trying to achieve the same look but with enough strength to hold up 2 or 3 (or 4) skirts.  I am also trying to keep the proportions grand enough for a costume as opposed to clothing. I find that I tend to err on the subtle or simple side.  That will NOT work for this event.


Slow uneven progress


Monday, May 13, 2013

Stays


Last week I finished the first piece of the costumes- My Stays!!  (As it is 4 months into the process... this does not bode well...but anyway...)

Being that I started this blog long after I started sewing- I don't have as many pictures of the process as I would like.  There are many many blogs devoted to 18th century stay-making.  [thanks both for the inspiration and overwhelming feeling of insecurity!] and so in the effort to not repeat what can be found elsewhere in better detail- I will simply give an overview of my process. 

An atypical effort went into achieving the proper fit of the stays as the fit of the garments over them will be determined by this one item.  If your stays don't fit- your gown never will.  Hopefully proper fitting stays prevent my gowns from looking like a rental!


The Pattern: 
 
I used a slightly altered JP Ryan's Half boned stays  Found here.  The major change that I made to the stays was that I eliminated the center front seam and made them wider.  The elimination of the center front seam was intentional-  making them wider was not.  Fortunately it worked out. Also I found that the directions for the pattern aren't great and are riddled with errors. I would still recommend it, however, as a starting point if you are a pretty confidant sew-er

Mock up 1:

I started by cutting out the pattern and making a simple un-boned mock up out of whatever canvas fabric I Had laying around.  I did this to give me a general idea of fit and if there was anything drastic that needed to be changed.  I found that overall this pattern was a close fit to my body measurements and that even with canvas I could see how the garment would reshape my figure. (I am just holding it shut here)


Cardboard Mock up:

Following some advise I found on different blogs I decided to make a cardboard mock up.  This was actually quite fun albeit more costly than I had expected. Duck tape is ridiculously expensive in the [easy to reach] places in the city and I was too impatient to wait.  Much to my annoyance- I ran out of tape midway and had to buy a second roll. I sat around for the cardboard stays for about an hour to let it fit better to my body and see how it felt. Actually I tried cleaning the apartment [do not do this].   It's amazing that I have a boyfriend really. [luckily he was out of town and didn't witness this level of crazy]  I could tell from the mock up that I was going to have problems with my bust/waist ratio. I always do with clothes as my waist is proportionately too large for my bust.
Trashion


Mock up 2: 
 
The cardboard mock up gave me a much better idea of where the garment [or I] had its shortcomings and where I needed to make adjustments but I still needed more accuracy.  So... I made mock up number 2. 

Mock up #2 is cut from the same canvas I planned on using as lining for the final garment.  I included a few bone channels to see what a stiffened effect would look like and punched eyelets in center back so I could lace it up on my own.  It was here that I eliminated the center front seam- and accidentally forgot to eliminate the seam allowance.

From this pattern I confirmed that the garment was too big in the bust [not helped by the additional 1" I added]  I went back to the pattern and removed 1.25 inches from the bust.

Final Garment:

Luckily I realized before I cut my fabric the error that I made above.  And so- I had a decision to make-  Should I cut the center front correctly and eliminate the seam allowance or should I leave it in and cut as I had already altered the pattern to fit?  At this point I did NOT want to make a third mock up [but briefly considered it]

I decided to cut the garment as per my second mock up because I really liked the additional width that the seam allowance gave me in the neckline. I want to be able to make the neckline of my gown really wide without having my stays show. 

I do not have any process photos here but as you would expect the garment goes together as per usual.  

The stays are boned with 3/16" oval cane that I bought from WM booth draper. I used 2 pieces in each channel (flat sides together) as suggested by the site.  This seems pretty strong and I like the narrow width of the cane.  The ends of the cane are cut, rounded and smoothed with sand paper. (you can still see them poking out in these photos)
Hey it looks like I have a bust.  (I really don't)

 
Striped lining
Back with offset eyelets. 


Hand Sewn Finishing:
  • Eyelets:  
  • Love this.
    • For my stays I learned how to make hand bound eyelets!  I am very excited about this as I debated it quite a while.  I used a metal awl I had fron scrapbooking to make the initial hole and then a bone awl I bought on a whim while getting my cane [so happy for that 3$ impulse buy]  I didnt have any button twist and instead used some natural colored hy-mark.
    •  By far this is the best thing to come out of this project. I highly recommend learning how to do this- its very easy once you've done a few.
  • Binding:
  • Bias tape and tab detail
    • I knew Sewing the binding would be a huge pain. I ignored the instructions and made bias tape instead of cutting on the straight of grain.  This made the process much easier however I am still not 100% thrilled with the look of the binding.  While it took me a long time to do- perhaps I needed to spend even more time perfecting the look.  It is entirely done by hand    
    • The binding alone makes me question the idea of ever making another one of these. Ugh
      Didn't know I had those.

What I like about them:
  • I'm pretty pleased with the overall fit (except as per below). I find these to be quite flattering on the bust line and they do a great job of reshaping my figure.  Unfortunately they do not downsize my figure at all and if anything the width of the stays and cane might make it slightly larger.
  • I like the effect of boning with cane.  It is light and seems stable.  I will be interested to see how they wear. I plan on bringing extra pieces of with me in case some snap during wearing
  • I know the color is plain but I actually like the idea of having neutral palette undergarments.  Initially I looked for a variety of printed/woven options but fear of having the pattern not fit let me start with less expensive unbleached denim. I think it is a nice contrast to the [likely] very colorful gowns that will go over them.

What I would change for "next time":
  • I would make my next pair slightly smaller.  The back of my stays matches up perfectly. I would prefer there was a slight gap to lace tighter if needed.  I am concerned that when they break in or if i lose weight (haha) that I will have to make a new pair. 
  • I would use stronger than regular thread to sew the pieces together.  I really really hope the thread does not pop as there is immense pressure on them.  So far it seems ok.
  • The pattern is a huge pain in behind when it comes to directions. Specifically in explaining boning the tabs. I am still not sure that i did this right. It really takes working through the process to understand what is being described
  • I would like to use a contrast thread on the boning channels. I briefly considered this this time- but to save time decided not to.

Wednesday, May 1, 2013

And it begins

This Blog is intended to chronicle the building of my (and Luca's) 18th century Venetian carnevale costumes!  

The planning for this process actually began back in January when Luca surprised me with a new years trip to Venice. Of course as someone in love with historical costuming- Venetian Carnevale has always been on my "bucket list"  Finally I have the opportunity to attend and participate in this event-.  


 While there are many many wonderful and talented historical clothing reproducers- my costumes are not intended to be that.  I plan to make them an amalgamation of period influenced shapes with modern details and construction techniques. Carnevale costumes are by definition over the top, fantasy masquerade wear- I am hoping what I make is no different.  

I plan on constructing a majority of the pieces-from the undergarments out- and filling in with store bought/altered pieces as necessary.  

Please join me on my journey and hopefully accomplishment of this overwhelming-but exciting- project.


Tuesday, April 30, 2013

Goals. I have them.

The list of Garments that I hope to make for this event is exceedingly (and perhaps unnecessarily) long.  For record sake I have itemized it below.

It will be interesting to see how far I get by the end of the process!


  • Per Lei
    • Undergarments
      • Chemise
      • Stays/Corset
      • Panier/Pocket hoops
      • Petticoat (decorative)
      • Quilted Petticoat
    • Gown 1
      • Robe a' la francaise w Polonaise option
        • For daytime wear
      • Fashion fabric Petticoat (visible skirt)
      • Decorative Stomacher 
      • Sleeve Flounces (interchangeable?)
    • Gown 2
      •  Robe a' la fancaise
        • For evening wear. 
        • More costumed (masquerade intended)
      • Fashion Petticoat
      • Decorative Stomacher
      • Sleeve Flounces
    • Accessories
      • Mask
      • Stockings (purchased)
      • Shoes (purchased and altered)
      • Cape
      • Wig/Hair pieces (purchased and styled- maybe outsourced)
      • Mitts
  • Per Lui
    • Shirt
    • Outfit 1 (intended for daywear):
      • Waistcoat 
      • Coat
      • Breeches 
    • Outfit 2 (As above- more costumed/masquerade)
      • Waist Coat
      • Coat
      • Breeches
        • If I am unable due to time/money to make a second outfit- I will make an alternative coat or waistcoat to dress it up.  Perhaps additional trim that can be quickly added as needed.
    • Stockings (purchased)
    • Shoes (purchased)
    • Cape
    • Mask (bauta!?)
The list for me far exceeds the list for him.  I admit,however, that his garments are more intimidating to me as I am not as familiar with constructing men's clothing. Certainly not as familiar with tailoring let alone period tailoring.